
- Login
A selection of tips for traditional painting. Most apply to all painting mediums (watercolor, acrylic, oils, etc) and some are more specific.
Brush care:
When painting, I use lots of different size and shape brushes that I keep altogether in a pot. When I use them, I leave them out on the table next to me, because I often will reuse the same brush a lot for each painting. This also means that once I’ve finished painting, it’s easy to grab up all the brushes I’ve used, take them to the bathroom, and give them a good clean. You can get specialist brush cleaning soaps and liquids, but some warm water and just a little shampoo work just as well. Washing brushes carefully and thoroughly after each use is a great way to look after your brushes and keep them lasting just a bit longer, by both conditioning the hairs, and removing more bits of paint than a rinse with plain water will.
Know your pigments:
Not all watercolour paints are made equal. Many people know there is a difference between opaque and transparent watercolours, but there are also staining, non-staining and granulating colours. Knowing which kind of pigment you are using really helps control your painting when layering, lifting colour, using washes, and all aspects of painting. If you use a staining colour, you’re going to have a lot of trouble lifting that colour back off the paper if you want to. Most watercolour brands will have a colour chart available which notes the different aspects of each colour, many downloadable from their websites.
It’s handy for almost all kinds of paints, watercolours as well as acrylics or others to have a chart, and also for ease of memory, sort and keep your colours in seperate groups for opaque and translucent, or even make up your own quick colour chart with notes as to each colours properties for quick reference.
Different brush types:
Get annoyed when you just can’t avoid brush strokes in your washes or textures? Normal sable or synthetic brushes are great for watercolours, you need that firmness/springiness in them for fine details and precision, however, for large washes and free painting areas, try some soft chinese brushes. I use wide chinese style brush with super soft fibres for flat washes of colour, and a large pointed mop brush for painting in smaller areas where I need a little more precision, but still a smooth wash of paint. Bristle brushes are seldom used for watercolour painting, and personally I find for any painting medium they are only good for special textures, dry brushing, or scrubbing paint back off an area.
Smooth gradients without a brush:
For watercolour washes, you can pour a wash of the paint onto the paper for a super smooth gradient. Control the area the wash will go by brushing in the area with clean water and a soft brush first. This creates a sort of mask- paint will move freely within the water, but if you’re careful it won’t flow onto the dry paper beyond. Pour the paint wash into the wet area from a small cup, or medicine dropper, and tilt the painting and steer the paint through the wash area until it’s all covered. Medicine droppers are also great for wet in wet textures or dropping drops of clean water into coloured washes, to create interesting backwash textures.
Tissues and painting:
This is a tip which made my life infinitely easier when painting. It’s simple, and yet works so very well! When painting, particularly watercolour, the amount of water on the brush is crucial in how the paint will react with it and the paper when the brush is loaded.
To maintain the right level of moisture in your brush, it works really well to keep a tissue in your other hand when painting. That way, you can dab your brush on it to remove excess water after you wash the brush, or dip it in your waterpot to wet it. You can dab a little, or dry it quite a lot, depending on the next stroke you want to make. You can dab off excess paint too, and you can even use the tissue as a blotter for lifting accidents off your page as well! Once you get used to using a tissue like this, you feel naked painting without something in your other hand.
Generally, you want your first strokes to lay down colour to be a medium to heavy load of paint/water. Once you’ve layed down some colour, you might want to soften and blend the edges of the paint stroke, in which case you will want a clean brush with a low to medium amount of water in it. With watercolour, if your brush has too much water on it at this stage, the water will backrun into the previous stroke and can ruin the smoothness of the stroke. Using the tissue means you can soak off much of the water from the clean brush after dipping it in your water pot, and avoid backruns.
Salting Watercolor:
One technique I see people always curious about, is salting. It’s a quite old technique, but a great one that can acheive wonderful results. A nice clear example of it’s effect can be seen in the background of this artwork-
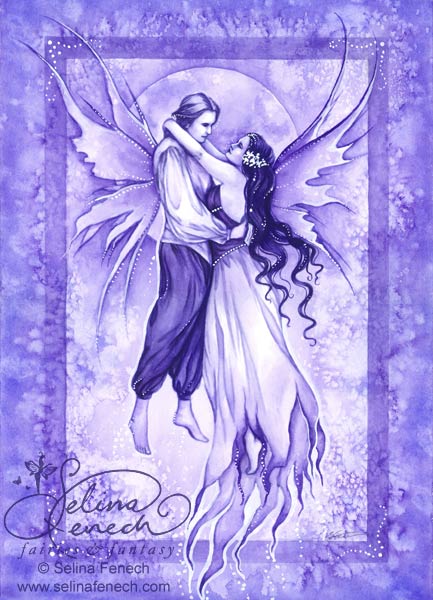
That star like, dappled texture is created when salt is sprinkled onto a watercolour wash while it is still wet. The salt then sucks the moisture out of the water where it lands, leaving the starbust effects. For those wanting to try it, experimentation and practice are needed, but once you understand the process it’s really quite simple.
Ways to get the best result-
1. Sprinkle the salt on when the wash is still wet, but not soaking. The paper should still have a slight shine of water, but no “puddles”.
2. If possible, you want salt that hasn’t already absorbed much moisture from the air. Salt is highly absorbent like that. I once left a small plate with salt out on a humid day and came back to find a puddle of water. You could try storing your salt with some plain rice (like they do in salt shakers at restaurants), or packets of moisture absorbers.
3. The type of watercolour paint quality and pigment type can also affect the outcome. I always recommend quality paints (artist grade over student grade) anyway, and these will get a better result for this technique as well. Granulating pigments will get a different look to non-granulating, and staining pigments may not work as well in general.
4. You can use many different types of salt, from large rock salt to fine table salt, to achieve different effects. Try a few different types to see which works best for you. When using large rock salt however, you may want to dip each piece in water immediately before placing it onto the watercolour paint, because they need the extra contact to the paper the water gives it to suck more water from the painting. Some artists use tweezers to place individual pieces of rock salt just where they want.
5 thoughts on “Painting Tips and Tricks”
I love all your tips, I find them very useful. Thank you so much for taking the time to help!
hi my name is selina to I have a family who loves art and are just as pro as you .sadly one of our best artist (my grandfather) past away.I want to become an authour one day and write fantasy and love stories their my faves . If i become an authour i want to draw like grandpa and because i to have a love for art fairies ,fantasy and books . i guess you could say we have a lot in common not to mention are names are spelled the same .I hope i can be as good as you .thanks for all the tips ! i think i may read a few of your books .Sincerely Selina .S
hey its selina agian just wondering what inspires you ? i really would love to know sincereely Selina .S
Hi! Thanks for all your comments. I’ve got a bunch of articles in my blog in the advice on art section that answers a lot of your questions like this one 🙂
The painting at the bottom is still a favorite after these yea many years.