
- Login
I’m working up a new mermaid concept for one of the cards in my upcoming Mermaids Oracle deck with Lucy Cavendish. I’m attempting to save work in progress shots as I go to show how I paint digitally. I don’t work exactly the same every time I paint, but here is an example of one way I work. I’ll describe what I’m doing at each stage under the image. Click the images for a larger version.

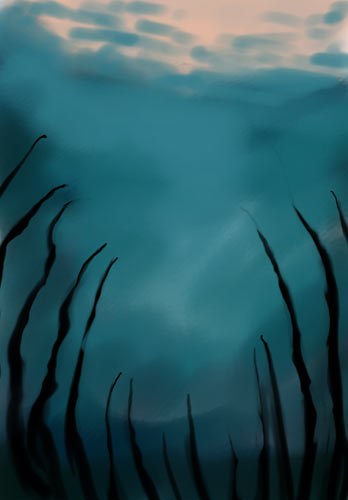
First I lay in some colour and rough background, just to get myself grounded. I love this aqua and light peach combination of colours, hinting at a sunset or sunrise above the water surface. I use a really large brush size and scribble the colour on.
For this artwork, I want to paint a mermaid lifting a man up to the water’s surface, away from ominous claw-like shapes in the bottom of the image. The concept provided by the deck author is for “Soul Cages” from which mermaids sometimes rescue men.

Once I have that rough background in place, I start roughing in the figures. And I do mean rough! I’m not working with any reference photos for this artwork, because I had a specific pose in mind and couldn’t find anything close enough. Reference photos make things so much faster and easier, especially for complex poses like this but we’ll see how I go… You can see the man has legs sketched in more than one position, still testing pose details.

More sketching, mostly on the man’s leg positions. Again, he’s got a “double” foot sketched in, me playing with positions.

Time to start cleaning up my mess. I solidify the lines I’m happy with and erase out the one’s that I’m not. The mermaid’s hand on the man gets the chop, it was wrong. The man’s face (bottom half only) comes into focus. I’m not sure about the idea of not showing the man’s eyes, but I like how his hair is falling. Eyes are important in artworks, one of the main things a viewer connects with, and this artwork (with the angle of the mermaids head as well) hasn’t got much in the way of visible eyes. It might change. I’ve also used the free transform tool to rotate and reduce the overall size of the figures. Free transform is to one tool I miss most between digital painting and traditional painting!

Time for a change up! I need a new perspective to get these figures right, so it’s Mirror Image trick time. Switching to the mirror image of your sketch can give you a new view on things and help get a better drawing. I sketch in a hand for the mermaid I’m much happier with, and a little shading on the man, who’s shoulder gets cut down to a better size. I decide I’m not happy with the mermaid’s body at all, it’s got to get redone from scratch (but keeping that hand I like!).

Lots of construction and mess around the mermaid while I’m trying to get her body sorted out. Getting a bit better, but still not right.

I’ve been looking at the figures for too long again, time for another switch to refresh my eyes. Mermaid’s body is coming up better now, so I start cleaning things up again.

I add in some more shading to the mermaid to get a better idea of her 3D presence, and give her some rough hair.

Fins! I wanted to do some really soft, wavy, feather fins for this mermaid. I also darken the bottom of the image a bit more with a simple gradient layer set to Multiply in the blending options.

About time for some colour, right? The card description talks about red-haired irish mermaids, so we’ll go with that. Red is a great colour for mermaids anyway, lovely contrasting colours for water settings! I add a little of the rusty red to the mermaids tail as well, and do some subtle skin colouring for skin that looks like it’s underwater. Dark grey/purples and greeny browns make up the skin palette, with a touch of the same peachy colour as the water surface for highlights. While adding colour to the hair, I’ve given it some more shape- digital painting for me is just slowly working each piece of the image from rough to refined. I’ve also done another free transform, reducing the size of the figures in the image again.

I go back to the background to finish up this concept. I add a couple of murky “cages” in the background, occupants included. A few hints of fish and bubbles, and add some more detail to the water surface. The man also finally gets some pants.
There’s still a lot more to do on this artwork, but this is the stage where I’ll normally stop and leave an image alone for a while, so I’m looking at it fresh when I go back again. I also want to contact the author and see if this artwork is working for the card description, and this is a good time to do so. While most of the image elements are now in place, I haven’t spent any of the hard hours of detailed refinement work still to go. It probably took me an hour and a half to get to this stage (between getting up every few minutes to drag my exploro-baby back to her approved play area).
This sketch actually went fairly smoothly for me, considering the lack of reference. Only a few complete limb rearrangements. I try to keep different elements on individual layers in photoshop to make painting easier as I go (background, figures, hair normally gets it’s own layer, foreground details like the bubbles).
11 thoughts on “Developing a Concept with Digital Painting”
beautiful work! hey, I sent you an email (rather important), did you get it? you have not replied, and I was rather worried… 😀
Love seeing how this is done digitally. I still use paper and pencil then paint. Might have to update my computing skills!
I love this work!!!I can’t wait to see the result!
wow outstanding work yet again!! 😀 its soo beautiful! Is there any name to this artwork like the others in your gallery?
I’ll think of a name for it while I’m finishing it off. It might be called “Soul Cages” after the oracle card it’s for if I don’t think of something else.
It’s always interesting to see how another artist works! I really like the composition of this one and the teal and peach color scheme. I always make the mistake of going way too light with water right away and I admire your comparative restraint. 😉
Thanks for sharing the process, Selina! Your post gave me some ideas on how to work on my art. Please, if you can, do a part 2! 🙂
That’s so amazing! What kind of tools do you use to paint digitally? A bamboo tablet?
Thank you! I use a Wacom Cintiq, but I was using an Intuous II for about 9 years before that.
Oops! I forgot to include this is my earlier comment 🙂 What program do you use to paint this?
I use photoshop CS5 for my painting. I’ve been tempted by Painter, but PS just has so many fantastic tools, and it’s painting tools have been way better since version CS4 too.