
- Login
If you’ve been following my Facebook or Instagram feed, you’ll know I’ve been experimenting for a while now. Trying new media, trying new styles, trying to re-find myself I suppose.
A lot of my artworks these days start from nothing. No idea, no inspiration. Just me and a blank canvas and a pencil-brush-marker-whatever drawing tool I feel like at the time. And I just start drawing and see what happens. Or just start painting. Sometimes it doesn’t work and gets left behind to maybe come back to later (I’ve had a couple of “resurrections” of such pieces that then turned into something lovely). Every one has been a lesson in some way.
I’ve been trying to document the process a bit more, but I’ve never been a very methodical person. So basically I sometimes remember to snap photos. I wanted to share the series of photos from my recent painting, Moon Boat.
Stage One

I was excited to score some 12×16 inch cradled wooden panels at a local craft store which is nigh unheard of here in Australia. Even a lot of the big art stores don’t stock them. So yay! I decided I wanted to try mixing a whole bunch of mediums on it, so I primed the board with Daniel Smith’s watercolor ground. Then I splashed a bunch of watercolour paint on it. Then some salt to try and draw out some texture. The paint didn’t hold very well to the ground. I’ve used it a bunch of times and never been very happy with the results, but I know others who love it… Maybe I’m not using it right, or got a dodgy batch? I was hoping to have more texture than this to start with, that could be the backdrop for whatever I painted over the top, but oh well, moving on.
Stage Two
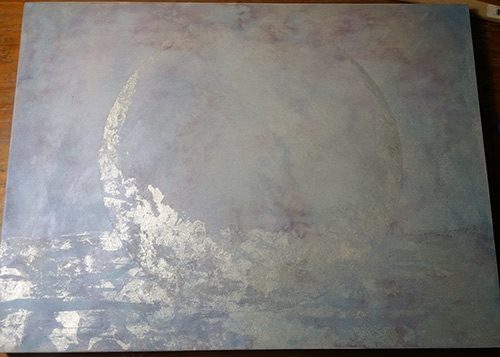
I’ve decided on a Moon Boat concept for the panel, and do a blue wash to head down a more purpley colour range. I mark out a sphere then roughly apply gold leaf sizing in the shape of a crescent moon and water, then apply pure silver leaf to it. I’ve been enjoying adding some gold and silver leaf to my works. Because shiny.
I realise afterwards I really should have sketched in my figure first and I’ve made some problems for myself, but that’s what you get with this rather unplanned and impromptu method. There is something to be said for careful planning!
Stage Three
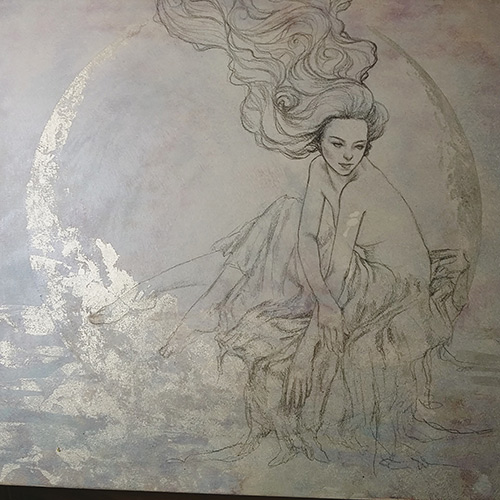
I sketch out the figure, based on a reference photo. I only have the top half of a body to reference, so drawing the feet is hard and I spend a long time twisting my own feet at weird angles to try and see how they should look. The watercolor ground continues to annoy me. A tiny drop of water got on her shoulder and lifted the paint right off it. I also have to sketch so softly or it digs into the ground. But I’m happy with the look of the figure at this stage. Still don’t know what else I’m doing with other details yet. Working unplanned like this is a process of Take Action – Ask “What next?” – Take Action – Ask what next, etc etc.
Stage Four
I add a string of bells and some flowers because I’m now sure what else to add. I like bells and flowers. They’re my go to.
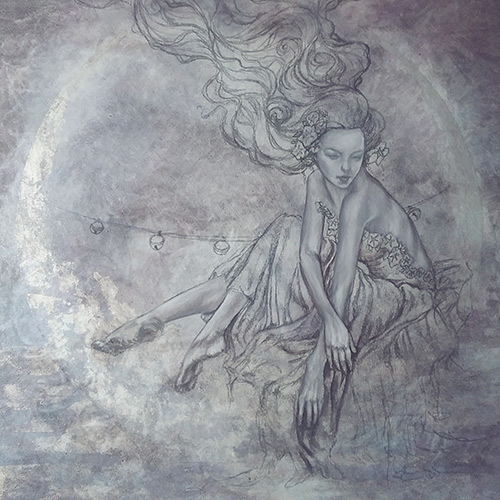
I want to finish this artwork in oils, so I make a grayish-purplish-brownish glaze and apply it all over, then sponge some bits back off with tissue for texture. I use the same colour I mixed for the glaze and some white to start adding form to the figure. The oil paint is taking well to the board, except where the silver leaf is.
Stage Five
I continue building form for the figure, her hair, and dress. I’m working mostly in greys, then start to add some warmth to her skin with reds. I have a very limited palette of oil paints so far, just two yellows (warm and cool), two blues (likewise), two reds (you get the picture), black, white, paynes grey (which is just a must have for me always), raw sienna, and burnt umber. I’ve done all my oil paintings thus far with just these. I’m using Liquin as my main medium for mixing.
Stage Six
I continue to apply layers to the painting. By this stage it’s probably had 5 layers/work sessions on it with drying between. I’m still learning oils, and tend to make areas too dark, and then make them too light when trying to adjust that, and then make them too dark again, spending more time than I need to. But I’m starting to get used to them and enjoy the feel of them as I paint. Still trying to work out how to get other mediums working with it. How lovely would this look if the original watercolor wash had held to the background and showed through around the figure?
I decide to call the artwork done at this point. The ground I used initially is still feeling a bit fragile and I don’t want to poke it too much. I also quite like the raw look it still has at this stage. Sometimes so much freshness and energy is lost from the sketch stage the refining process.
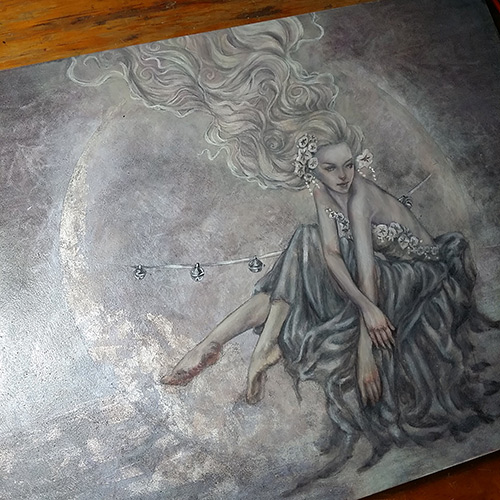
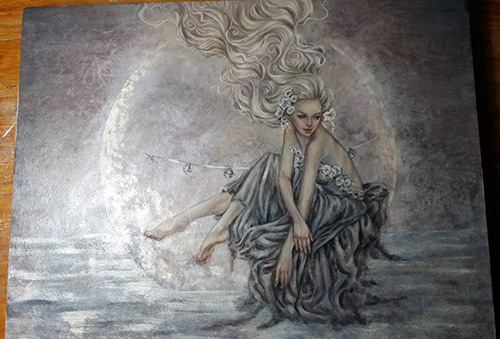
Stage Seven
The raw scan, straight from the scanner without any cleaning or color adjustment. It’s a lot more pale and purple than my photos from my smart phone, which is a bit more true to how it appears in real life, but it still needs some adjusting. The scan won’t be able to capture the way the silver flashes in the light either.
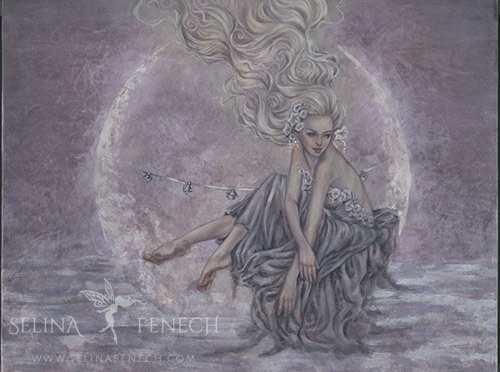
Stage Eight
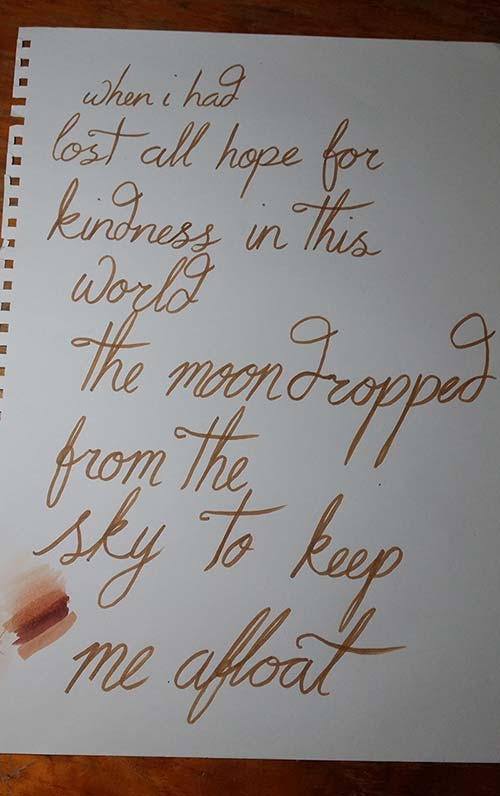
I’ve been wanting to try and include words into my artworks, and this moon boat image seemed like a great one to experiment with. I came up with a phrase for it, and decided to try a hand written approach rather than just adding text digitally (great idea, from someone with terrible handwriting and no calligraphy training!). I wasn’t quite game to write directly on the original so I sketched it out on a sketchbook page with a copic marker pen. I didn’t rule lines or anything, which is a great indicator of the “not being very methodical” thing I was talking about before, but I kind of wanted that more rustic feel. If I wanted perfect calligraphy, well, I’d just use a font. I scan the words in and apply them over the artwork in photoshop while I clean and color correct the image. I also apply a splatter of starts digitally, because I’m too chicken to do it to the original.
Stage Nine- Final

And here is the final artwork. She was a bit of a crazy experiment from start to finish, but I do like how she ended up.
I learned lots during the process about all the different mediums I tried and how I could have done things better that I can apply to future works, so that’s the most valuable part for me.
12 thoughts on “Experimenting and Moon Boats”
You have done a FANTASTIC job Selina, you really are a master at creating something out of nothing. Even with all the hiccups along the way… so relieved to hear its not only me. I am self taught so yeh I’m hearing ya.
I love to learn how you create art so, thank you for sharing 🙂 The figure’s pose is just gorgeous and elegant.
It’s always a process, right? I’m glad you like it.
Selina
I love your pictures and drawning
They enlight me and inspire me
When looking at them, i feel the magic of life, a smart sensuality , and such a finesse in every detail
Thank you so much for every moment i spend to enjoy such a beauty
veronique
Thank you so much.
Very Enchanting!!!!!!!!
Thank you!
i love your art! i cant get my color pencials to do justice to your work
I absolutely LOVE this painting, the words in it describe how I feel to a T! So beautiful and breath-taking, your art is amazing!
Moon Boat was a Thrill to watch you bring to life..it touched me deeply..im sorry someone grabbed it before I! ! Loved Cathie..carry on little one you are a delight to watch but I must rest for this old lady is tired !
You go girl, you are amazing, needless to say. I love your work.
Watching this painting take shape as you showed the steps that you took to paint it was amazing! It is a beautiful piece of stunning artwork that should be displayed for all to see! Thank you for the insight into your little painting world.
Thank you! This was quite the experimental one, but I liked the end result.